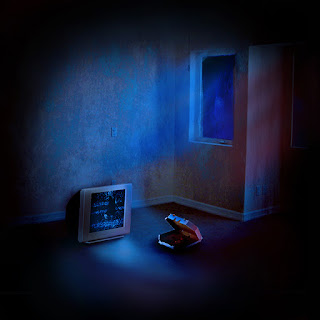
In my Last post I showed off this cover image I made in photoshop for a musician. Now one of the cool things about the photoshop psd files is how compatible they are with After Effects. Using the layers of paint in photoshop within afterfx, I am able to manipulate their properties and animate them. For this piece, I thought it would be really neat if we could animate some of the lights to go with the beat of the song it was made for, here was the final product.
Now first I will say that the animated waveform and presentation was created by Glory vs Failure, but in the original picture you see, the police lights and glare from the tv are synced to the beat of the song. If you look hard enough you can see a bit of animation on the white noise of the tv as well.
As complicated all of this may seem, it is actually rather simple to achieve, and the outcome is something more unique than having a static image for the video.
You can go ahead and import your psd file right into the program, choosing weather to flatten the layers, or import a specific layer. For this project I simply created a new psd in photoshop without the lights and flattened that, then individually imported the layers with the light paint.
When you have an audio file in after effects and its is in the composition, you can right click and go to keyframe assistant > convert audio to keyframes. This will do exactly what it says, essentially turn your waveform into keyframes. You will also notice that this will create an audio amplitude layer in your composition and this is what we are going to work with. If you drop down the options for this layer, you will see right, left and both channels. You can actually delete the right and left channel as we wont be needing them here.
You can now use this data to create an expression for any of the values on your photoshop layers that you have imported. To do this, we are going to look at the properties for our layer. For this project I decided to animate the opacity, to get it the "shut on shut off" look. You will see the stopwatch next to the property that you wish to animate, but opposed to clicking the watch like you may normally do, we are going to alt+click the stopwatch. This will set us up with an expression.
Now for the magic, when we alt clicked that watch, it created our expression (line of text in the composition it self) but it also gave us a few more options.To sync this value with the keyframes we created for our audio track, we are going to click and hold the pick whip option (the spiral you see in the photo below) then we are going to drag the line you see it create right over to the "both channel" option right under the audio amplitude layer we recently created and bam, you have animated your opacity to go along with the beat.
As you can see it is rather simple to set up, but there is a lot of you can do with this trick and some polish may be needed to achieve the effect you have in mind. Use your creativity to see how far you can push the tool. The animated sound wave you see in the video can be made through similar methods as well.
I will give one extra tip as this was a problem I ran into. When I synced my opacity to the beat of the track, it was not pushing up the values as far as I needed, as a result the flashing lights were just not noticeable enough. We can manipulate this by adding a multiplier to our expression. If we go back to the opacity on the layer we animated and look at our expression, we will see something like this (note some parts may differ depending on the layer name and what you are choosing to animate);
thisComp.layer("Audio Amplitude").effect("Both Channels")("Slider")
To increase how much our opacity is adjusted we are going to add *x (where x is the amount you will be multiplying the adjustments by, for this case I used 5)
thisComp.layer("Audio Amplitude").effect("Both Channels")("Slider")*5
With that, you will see that the amount the opacity is effected is much larger.
Once again check out the track here;
https://www.youtube.com/watch?v=TZ6r-h9JLGU&feature=youtu.be
Also be sure to check out other work from Glory vs Failure
http://www.gloryversusfailure.ca/
https://www.facebook.com/gloryversusfailure
https://twitter.com/gloryvsfailure
Wednesday, 16 December 2015
Tuesday, 8 December 2015
GvF Single Artwork
Here is a piece I did up in photoshop for my buddies over in GvF. This is a cover for a song titled "that sucks" by JKenny. Check out the groups bandcamp and I will update with a link to the track once it has been released. (find that track here https://www.youtube.com/watch?v=TZ6r-h9JLGU&feature=youtu.be)
http://gloryversusfailure.bandcamp.com/
This song talks about a breakup, and I took inspiration from a few lines. He talks about about how his items were taken, broke a tv, ordered a pizza and the cops showed up. Now there is much more to the song it self, (its actually fantastic, I recommend you check it out once I update this post) but when creating a cover image you want to keep the message simple and uncluttered. Then to make good use of the information you decide to include to properly tell the story the artist is writing about.
 This was made in photoshop, with a bunch of stock photos thrown into a scene, bent the perspective on the photos and ran them through a ton of layers. I also touched it up with some classic painting techniques to make it look like all of the objects are lit the same. When using stock photos, manually lighting the objects is how the piece will become cohesive.
For those of you looking to do something like this, get used to the skew tool. This can be used to alter a perspective of a static image making this possible. Keep your psd files as well, with these you can throw this into a composting program like afterFX to animate the police lights, and the flickering from the broken tv to create a dynamic video. Take a look at my next blog post to see the results!
http://gloryversusfailure.bandcamp.com/
This song talks about a breakup, and I took inspiration from a few lines. He talks about about how his items were taken, broke a tv, ordered a pizza and the cops showed up. Now there is much more to the song it self, (its actually fantastic, I recommend you check it out once I update this post) but when creating a cover image you want to keep the message simple and uncluttered. Then to make good use of the information you decide to include to properly tell the story the artist is writing about.
 This was made in photoshop, with a bunch of stock photos thrown into a scene, bent the perspective on the photos and ran them through a ton of layers. I also touched it up with some classic painting techniques to make it look like all of the objects are lit the same. When using stock photos, manually lighting the objects is how the piece will become cohesive.
For those of you looking to do something like this, get used to the skew tool. This can be used to alter a perspective of a static image making this possible. Keep your psd files as well, with these you can throw this into a composting program like afterFX to animate the police lights, and the flickering from the broken tv to create a dynamic video. Take a look at my next blog post to see the results!
Saturday, 5 December 2015
Player Profile Posters
So I have been rather busy this last week with these photoshop commissions. For these I had a group of photos for each player to choose from, cut them out and throw them in a scene for some posters. Most of the editing is actually just done through manual painting techniques and barley any photoshop filters. I completed about 10 of these, but these are my favorites.
 |
Subscribe to:
Comments (Atom)


